September’s New Recipe: Basil, Chicken, and Vegetable Curry

I’m already failing on one of my new (school) year’s resolutions. Finding recipes quick enough for weeknights is more of a challenge than I thought, due in part to the fact that this is a really busy time of year for my job and part to the fact that Little Miss is getting really tired out by her days in her new classroom at school. She comes home hungry and tired and ready for dinner, a bit of playing, and bed, and there’s not a lot of time for cooking in there. But I’ll figure it out–it just might take a bit.

As for my other resolution, though, I can check that off the list with great success. My new recipe for September was Basil, Chicken, and Vegetables in a Coconut-Curry Sauce. It was delicious, came together relatively quickly, and reheated well–an all-around win in my book!

There’s a bit of prep work, with cutting the pepper, snapping the beans, and slicing the chicken, but the whole recipe can be made in about the time it takes to make a pot of rice. And it is delicious. The sauce is smooth, rich, and flavorful. We’ve found on dishes like this in the past that it can be a little alarming to use whole-fat coconut milk–it’s best not to read the nutrition info on the back on the can.  However, we’ve also found that it is just not worth it to use the low-fat stuff, either.  The sacrifice you make in flavor and in texture…well, we figure, if we’re going to do it, we’re going to go all in and do it right.  Chris said this curry could have used a bit more heat (I omitted the Sriracha entirely); I didn’t miss it. I enjoyed mine with the cashews, thinking it added a really nice extra element to the dish; Chris preferred his without.  But we agreed that this is definitely a recipe we’ll make again!

(Sorry there’s no pictures. We were too busy eating to take any good ones!)

The yearly tomato surplus

photo 2
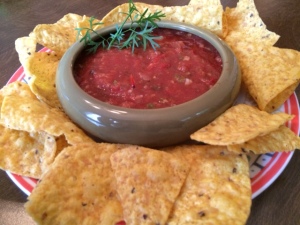
What do you do when you have far too many tomatoes? I always seem to end up with more tomatoes than I know what to do with. Partly because one day, I blink, and suddenly my garden has decided to do something and I get a wave of cherry tomatoes, more than I can devise dinner plans for. Partly because my husband won’t eat raw tomatoes, so I’m on my own. And partly because I love tomatoes, so I end up buying far too many at the farmers’ market, because they look so beautiful and I forget that I’m going to get armloads of cherry tomatoes any day now and I’m the only one who enjoys them anyway.
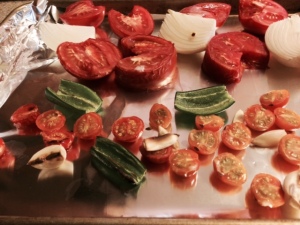
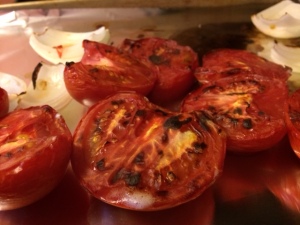
So, tomato surplus. It’s a yearly occurrence around here.

photo 1_2Last year, I tried Oven Roasted Tomatoes, and they were pretty fabulous.  We used it as a sauce over pasta, and it was so fresh and full of tomato flavor, it was a real treat.  However, what my sad little garden does best (or, the only thing that my sad little garden does at all) is make lots and lots of cherry tomatoes.  And halving and roasting all of my sweet little tomatoes, and taking them out of their little red and golden skins, one by one by steaming hot little one, was…trying.  And time-consuming. Delicious, but time-consuming.

Then I tried Cherry Tomato Jam.  It sounded delicious, though perhaps something more to my tastes than Chris’s, and I envisioned it with some cheese on a nice crusty piece of bread.  It was very good (though, as predicted, Chris was not interested.) Only problem being, I couldn’t figure out what else to do with it.  So I think I still have a few containers of it in the freezer that I never got around to using.

This year, I decided to try something different, hopefully something a little easier and something we’re more likely to actually eat: salsa. I found this great recipe for Three-Ingredient Summer Salsa while searching for dinner inspiration on Smitten Kitchen, one of my favorite food blogs. And I think we have a winner! It took longer than the 10 minutes of broiling that she suggests, though, in fairness, I did double the recipe. But it was pretty easy to throw everything together; it was just a matter of sticking around the kitchen when the broiler was going so I got a nice char without burning anything.  After a few tries, I turned off the timer and just watched it, so I don’t actually know how long it took.  I used about 4 medium tomatoes and a handful of cherry tomatoes, both red and orange, 2 jalapenos, 5 cloves of garlic, and 3/4 of a sweet onion.  (It was what I had left from last night’s dinner.)  I also added a few things after pulsing everything in the blender: two generous pinches of salt, about a teaspoon dried cilantro (I didn’t actually measure any of this…), about a tablespoon ancho chili powder, and the juice of 1/2 a lime. It was delicious! I can’t wait to eat some with our tacos tonight, and I can’t wait to show off and serve some up for our friends coming over for dinner on Saturday!photo(1)

Does this mean I get to buy more tomatoes at the farmers’ market next week?


Chai Snickerdoodles

IMG_1170Time for a recipe post! I’ll admit, it’s not a great picture because the sunlight was a little too bright and you lose some of the detail in the food. Like the amazing sugar and spice mixture that covers these chewy snickerdoodles. But as I was enjoying a book, my coffee, and a couple cookies on the porch during a lovely cool morning (what–you don’t eat cookies with your morning coffee for a little something sweet?), I realized that if I was going to tell you about this great recipe, I should have a picture to go along with it.

We made these cookies most recently for Chris’s annual work picnic last week (and there were a few left over, so we’ve been enjoying them ourselves since then). They’re a wonderful treat.  They really are reminiscent of the spices in a chai tea. And they bake up soft and chewy, with a little crispness from the sugar on the outside.  This time, we used a little disher to measure out the cookie dough.  It had the added bonus of automatically making perfect little balls of dough–no rolling between your hands to get them properly formed!

A couple of notes about tackling the recipe. First, the 1/4 cup sugar-spice mixture that you reserve to roll the cookies in will not look like a lot. It will be enough. Don’t be afraid to really roll them.  Second, we’ve had mixed luck with the baking time.  It might be because our cookies were a little larger this time–the disher might have been a tad bigger than it needed to be, but it was so worth it for the time it saved–but I feel like I had this same struggle last time and I ended up overcooking them.  I have not found 8-10 minutes to be enough. I cooked them closer to 14 this time, and they were just barely cooked through. They could have stood another two minutes or so.

The only downside? The go stale more quickly than most other cookies I’ve made.  The upside? That just means you have to fully savor them while you can.

So if you’ll excuse me, I have a cup of coffee that needs some accompaniment…

Here’s the recipe:

Chai Spiced Sugar Cookies at My Baking Addiction

A whole bunch of new recipes with a very autumnal theme

Call me lazy.  Or just really busy.  But I’m going to mush my five (yes–five!) new recipes we’ve tried in the past three weeks or so into one gargantuan post.  But each individual review will be fairly short.  I’ve been slacking on my camera duties when we’re done cooking, and for most of them, I followed the recipe exactly, so there’s not going to be too much to say.  Ready for my delicious fall spread?

The first thing we made, and this was a while ago, was this Chicken and Vegetable Lasagna.  I won’t lie–this was time consuming.  It wasn’t hard, but there was a fair amount of chopping and cooking even before we could put the whole thing in the oven for 45 minutes.  That being said, it was delicious!  It was rich and creamy and chickeny, very different from a traditional lasagna and a little bit heavier.  The vegetables were great–I was generous with the amounts that I used, and I might even use a bit more next time.  The one definite change we would make is either cooking the chicken whole and then shredding it, or maybe even just using a rotisserie chicken.  The pieces we cut to saute were too large, which made it a bit difficult to eat.  Shredding into smaller pieces would be the way to go.  Another plus to this dish?  It makes a lot, so there were lots of leftovers–and it reheated well for another dinner or for a hearty lunch.

Next up was these Pumpkin Oatmeal Cookies.  I needed something to bring to a departmental work day at school.  Last year I made pumpkin hummus and it was a huge hit, so I felt like there was some pressure to deliver something good!  (I could have brought the hummus again, but how predictable would that be?)  I found these cookies and thought they looked like a nice fall treat, and they definitely were!  They stayed nice and soft, and there was a hint of pumpkin without it being overwhelming.  I liked the tartness of the cranberry and the sweetness of the white chocolate; Chris said he thought they’d be better with dark chocolate.  I think that could certainly work…but he also just isn’t a huge fan of white chocolate.  Oh, and as a side note, this recipe makes a lot of cookies!  I probably ended up with 3 dozen respectably-sized cookies.  I’m glad I didn’t decide to double it!

Next on our list of culinary adventures was this Chicken Noodle Soup.  We have a bunch of homemade chicken stock in the freezer, but for some reason, I’m waiting for the “perfect” opportunity to use it.  So, I thought I would try to recipe for chicken soup and see if it still provided a flavorful enough base, even with just simmering for an hour.  And the answer?  I added a little bit of Penzey’s chicken soup base to ramp up the flavor, but with that extra boost, it absolutely did!  This soup was fantastic.  Flavorful and filling, stuffed with tender meat and fresh vegetables and lots of noodles.  Comfort food at its best.

Our next endeavor was one that took a little more effort on our parts.  We kept putting it off because our weeknights have been late and hectic, and who wants to eat dinner at 8:30 on a school night?  On a Friday, though?  That’s apparently okay.  So on Friday we undertook this Pumpkin Risotto.  The recipe calls for scallops and candied pancetta (which I’m sure would be delightful), but we opted for a roasted pork tenderloin, something we could season, throw in the oven, and not worry about while we busied ourselves with the risotto.  The risotto was wonderfully creamy and delightfully pumpkin-y, and I really liked it with the pork.  There are two adjustments I would make to the recipe, if you’re thinking of trying it.  First, we were lazy and opted not to blend up the pumpkin puree and butter–and we couldn’t tell the difference.  As long as you melt the butter in a little at a time and make sure it’s mixed up really well, I don’t think the blending is necessary.  Save yourself the extra dishes!  Second, make sure you taste the risotto for doneness before adding the pumpkin puree and the final ingredients.  We didn’t do this–we should have known better–and we ended up with slightly al dente rice.  It probably could have used another ladleful of broth.

The final fall recipe I’ve got to share with you is for your weekend mornings, something to munch while you curl up with a warm beverage of your choice.  Check out these Pumpkin gingerbread biscotti.  (If you’re fall-crazy like I apparently am this year, one large can of pumpkin should see you through the oatmeal cookies, the risotto, and a double batch of the biscotti.)  I made them yesterday as a splurge to myself–besides, I had all of the necessary ingredients, so I considered it something like fate.  I was initially a bit concerned about all the spices, but the cookie’s flavor isn’t too heavily spiced at all.  And the smell as they’re cooking?  Amazing.  (Chris came in from walking the dog and pronounced that it smelled like home.)  I think I skimped a little on the first cooking time, and so my cookies could be a little firmer.  Another change I made that might have thrown the texture a bit was chopping the walnuts and adding them right to the batter, along with a dollop of extra pumpkin because the batter was so dry, I couldn’t get all of the flour incorporated.  I was going to mix in white chocolate chips, too, but I forgot, so I “iced” them with white chocolate after they cooled.  They don’t look as pretty as the picture on the website, but they’re still really tasty.

*Phew!* So, that’s my fall rundown.  For now, at least.  I hope if you’re looking for something with an autumnal twist that you can find something here that you’d like to try!

Fall! And new recipes!

Fall is officially upon us, the air is cool, the leaves are changing, and I’m in the mood for heartier dishes using some of those great fall flavors.  We’ve tried three new recipes lately (and we’re trying a fourth tonight), so I’ve got some good blogging fodder for the moment.  Only some of these come with pictures, though, so I’ll start with a simple recap.

The first of our new fall adventures was a Butternut Squash Macaroni and Cheese from the Two Peas and Their Pod blog.  I’ve had this recipe pinned for months, but it was finally getting to the time of year when I wanted to give it a try.  I won’t repost her recipe here, because this time around, I followed her directions as closely as possible.  I’ll just add some of my own commentary.

This dish was really good.  The squash made it super-creamy and silky in texture without bringing an overbearing squash flavor.  (It felt a little bit tricky, sneaking all that squash in there.  It reminded me of my college roomie who would have to disguise veggies–for herself!–in order to eat enough of them.)  I did want more cheese, however.  Chris and I agreed on what we might change next time–we would add about another 1/2 cup of cheese to each of the layers, and we would mix in 1 or 2 cups of cheese to the squash mixture before adding the macaroni in.  That would really make this incredible.  As it was, the slightly crunchy, cheesy bits along the top and sides were just the best.  And it actually reheated really nicely over medium high heat in a frying pan, with a little bit of milk and plenty of extra cheese sprinkled in.  Once we added more cheese, it had the creamy texture of Velveeta mac and cheese, which is one of our guilty pleasures.  And any time I can get that texture with a vegetable instead of processed cheese product, it’s a good thing!

So, if you’re looking for a good fall recipe with a hidden veggie punch and a rich and creamy texture, give this mac and cheese a try.  I’m looking forward to trying it out again soon!

Preserving the End of Summer

Sorry about the long writing hiatus, folks.  Of course I’d pause the blogging over the summer, only to pick back up during the school year when I have things to grade and prepping to do and all that other great stuff, right?  As such, (and as life is soon going to get much crazier than ever), these posts will certainly be infrequent, but I recently ran into something too good to not share.

Throughout the summer, our tomato plants had been dragging.  I saw the green fruits, but they weren’t doing anything.  Then, all of a sudden, about two weeks ago, we had an overabundance of tomatoes.  But of course, by that point in time, summer was dragging to a close, I was back in school, and I was out of the summery eat-all-the-tomatoes-I-can mood.  I didn’t know what to do with them.  So, I found this lovely way to preserve all that great flavor for another day!

Check out how I did it, courtesy of from Gina at SkinnyTaste.com: Oven Roasted Tomatoes.

We made a small batch and had it with pasta, and we liked it so much that we made another, larger batch and froze it for later.  I’m hoping I might possibly be able to squeeze one more batch out of my tomato plants before they give up for the fall.  There were two adjustments (especially the second time around) I made to the original recipe that I thought helped.  I found it difficult to get the tomatoes off of my baking dish if they were flesh-side down; it worked better for me if they were skin-side down.  I may have sacrificed a bit of flavor that way, but I had more tomato to work with.  Second, I don’t know how she was able to keep her tomatoes in the oven for 30 minutes!  After 15 minutes the first time around, I set off the smoke alarm.  The second batch was much larger, but it still only took about 20 minutes total–I turned the pan halfway through.  I’d set the timer for 10 minutes and check on them before assuming they’ll take the full half hour.

If you’ve got leftover tomatoes, or your local farmers’ market has some stragglers left, this is such a delicious way to capture that summer flavor.  Absolutely worth checking out.  I can’t wait to do this again next year–it’s just that good! 🙂


In Which Pinterest Makes Me the Star of the Picnic

Okay, so that’s more than a slight exaggeration.  But still.  The end of the school year was defined by Pinterest recipes for my gatherings, and both of them were a pretty big hit!

First up, this orzo salad.  I made this for our faculty picnic, and it was wonderful.  I was inspired to “pin it” and then try it because Giant Eagle makes this wonderful orzo salad that I can’t pass up any time I see it, and this recipe looked a lot like it.  It tasted similar–perhaps even better–and I will absolutely be making it again.  It was a great picnic contribution, and the leftovers worked really well as a side dish, too.  I used kalamata olives instead of green, but otherwise, all ingredients were the same.  Actually…that’s not entirely true.  I doubled the amount of dressing, partly because recipes never seem to dress things quite enough for me, partly because I had a grand orzo mishap.  The first batch of orzo that I made went mostly down the drain–literally–because it slipped right through the holes in my pasta strainer.  Not one of my shining moments.  Luckily, I had bought a second package of orzo, but neither package was the amount called for in the recipe, so I just guesstimated.  Still turned out pretty tasty, though!

The second and final dish for today is these cheesecake cookies.  I brought these to a post-graduation gathering at a friend’s house, and they were pretty decadently delicious.  We used both cherry pie filling in some and blueberry in the others; the cherry was definitely my favorite.  And, amazingly, they really do taste just like little mini cheesecakes!  They were rather difficult to transport, and slightly difficult to eat, because they were fairly soft, though apparently they should be stored in the refrigerator, which has the added benefit of firming them up a bit, too–that’s an important note for next time.  They were rather time-consuming, but so tasty!

Pinterest, you may be my  new (dangerous but oh-so-creative) cooking buddy.

A Simple Burrito, but So Delicious

This is just a quick post to share what might become a favorite summer recipe this year.  Chris and I tried this recipe for Vegetable and Rice Burritos a few weeks ago, and we liked it so much that we turned around and made it right away again the next week.  (This was made especially possible because the amount of ingredients that the recipe calls for left plenty to make it again–we still had half a zucchini, half of a container of sour cream, plenty of cheese and tortillas, etc.)  The recipe doesn’t sound like a big deal.  In fact, we almost didn’t try it, but I was just looking for something different and didn’t feel like making a meat dish, so we “settled.”  But it was truly a recipe where the whole was far greater than the sum of its parts.  Once they were cooked up, the cheese melted and the sour cream worked its way throughout, and everything just melded wonderfully.  Chris didn’t even miss the meat!

I’ll just link up to the recipe, as we really didn’t change anything.  For those of you who might be concerned about the heat (I’m looking at you, Mom…), while it wasn’t really too hot because of the sour cream, I imagine you could omit the jalapeno and could probably substitute some fresh parsley for the cilantro.  Also, we used a shredded Mexican blend of cheeses, as I can’t have the soft cheeses right now.  It was probably significantly cheaper and still made for a great burrito.

Check it out: Vegetable and Rice Burrito with Quesadilla Cheese from Cooking Light Magazine

Thai Beef Marinade

Just posting a quick recipe recap for a meal we threw together last week.  We didn’t marinade the meat for the full time allotted in the recipe, and it was still quite flavorful and delicious.  I might marinade it longer next time, both for some added flavor and some tenderness.  The flavors all came through nicely–lime, soy, ginger and garlic–with nothing really being overpowering.  We had it with the longest-cooking batch of brown rice I’ve ever made (delicious though it was) and a veggie, and it made for a lovely meal.

Thai Beef Marinade

  • 1 pound top-round London broil or flank steak, about 1 to 1 1/2-inches thick
  • 3 tablespoons lime juice, divided
  • 3 tablespoons low-sodium soy sauce
  • 3 tablespoons canola oil
  • 2 tablespoon brown sugar
  • 1 teaspoon minced garlic and 1 1/2 teaspoons minced ginger (or 2 teaspoons ginger-garlic paste)
  • 1 1/4 teaspoons red curry paste or chili-garlic sauce (or a few grinds of curry powder)

Rinse and pat the meat dry. Place in a sealable plastic bag or small glass dish. In a medium bowl combine 1 tablespoon of the lime juice, soy sauce, canola oil, brown sugar, garlic, ginger and red curry paste. Pour half the mixture into the bag with the meat. Add the remaining 2 tablespoons lime juice to the bag. Seal tightly, and marinate meat in refrigerator at least 4 hours or overnight, turning occasionally. Reserve the rest of the mixture refrigerated, to dress the salad.

Spray grill or grill pan with cooking spray and preheat. Grill steak until medium-rare, about 5 minutes per side, depending on desired doneness. Let rest until room temperature then slice thinly against the grain.

The Hunger Games Lamb Stew

My mouth has gone as dry as sawdust. I desperately find Cinna in the crowd and lock eyes with him. I imagine the words coming from his lips. “What’s impressed you the most since you arrived here?” I rack my brain for something that made me happy here. Be honest, I think. Be honest.

“The lamb stew,” I get out.

Caesar laughs, and vaguely I realize some of the audience has joined in.

“The one with the dried plums?” asks Caesar. I nod. “Oh, I eat it by the bucketful.” He turns sideways to the audience in horror, hand on his stomach. “It doesn’t show, does it?”

This Saturday, I had a chance to celebrate some good YA literature and transport Chris and myself to Katniss’s trip to the Capitol for the 74th Hunger Games.  I found this recipe (and the excerpt you see above from the book) on FictionalFood.net, where the author has modified a recipe from Julia Child to fit some of the parameters of Katniss’s favorite meal.  I picked it for this weekend, thinking it would be a fun little experiment and thinking that I would feel quite literary.  We couldn’t fit any reasonably-priced lamb, so we bought some stewing beef and figured we would make it work.  And, I must say, I was blown away by the deliciousness of this dish. I expected it to be more for fun than anything, but it was awesome!

First, the flavor.  It was really layered–and I think a large part of that came from my addition of Penzey’s beef soup base.  Before adding that, it was kind of one-dimensional, but the soup base added depth to it.  And the plums at the end gave just a little sweetness to it.  I all but licked my dish clean.  Next, the texture.  The meat cooked for long enough to be nice and tender, despite my initial misgivings after heating it in the pan for a few minutes.  It looked kind of tough and rubbery, but while it didn’t end up fall-apart tender, it was still very good.  And the sauce was fabulous–a thick gravy filled with meat, potatoes, and carrots.  The flour really did its job in bringing it all together.  I was so pleasantly surprised with this.  I can’t wait to make it again.  (Oh, the other lovely thing?  It made so much food, I actually put half of it in the freezer!  I hope it freezes well, because I’m looking forward to enjoying this for many more meals!)

Here’s FictionalFood.net’s recipe with my adjustments:

  • 3 lbs beef, cubed
  • 2-3 tbsp cooking oil
  • 1 tbsp sugar
  • 3 tbsp flour
  • 21-28 ounces beef broth
  • 3 tbsp tomato paste
  • 2 tsp dried (or 1 sprig fresh) rosemary, leaves crushed
  • 2 tsp crushed savory leaves
  • 3 tsp Penzey’s beef soup base
  • salt to taste
  • pepper to taste
  • 3 large carrots, peeled and chopped
  • 2 medium potatoes, peeled and chopped
  • 1 cup frozen or fresh peas
  • about 12 dried plums cut in half

Instructions

  1. Heat oven to 475 degrees.
  2. Heat oil in a skillet and brown meat. Transfer to dutch oven as pieces cook.
  3. Sprinkle sugar on browned meat. Cook meat for several minutes on medium high heat to caramelize sugar.
  4. Toss meat with flour until well coated. Place pot in oven uncovered for 5 minutes. Toss meat around and cook for another 5 minutes. Reduce oven heat to 350 degrees.
  5. Add 21 oz of beef broth, tomato paste, rosemary, and savory leaves. Cover and cook on bottom third of the oven for 1 hour.
  6. Taste and season with salt and pepper as needed. Add beef soup base and stir in well.  Add carrots, potatoes, and more broth if needed.
  7. Cover and return pot to oven for another hour. After 30 minutes, add dried plums. Once done, taste and season as needed.
  8. On the stovetop, boil peas for 1-2 minutes. Drain and add to stew just before serving.
  9. Serve on wild rice, if you’re feel authentic to the book. Eat by the bucketful.